

Round-Robin Record Assignment: Real-Time vs. Background Workflows
One of the most important differences between real-time and background workflows is that all of the actions performed by a real-time workflow process are treated as part of a single transaction.
One of the most important differences between real-time and background workflows is that all of the actions performed by a real-time workflow process are treated as part of a single transaction. Background processes don’t work like that: actions they perform are handed off to the asynchronous process server and are treated independently. This distinction accounts for some of the most important advantages of real-time workflows.
First, because all actions of a real-time workflow are part of a single transaction, they can all be rolled back together. Suppose a case resolution process starts by sending a resolution email to a customer, then later in the process encounters an error that prevents the case from being resolved. If that’s a real-time process, it can be rolled back and the customer never gets the email. But if it’s a background process it's too late: by the time the error condition occurs the email’s already been sent.
This opens up a brand new category of workflow process in Dynamics CRM 2013 in which we can apply conditional logic to user attempts to delete records or to change field values or status, and if appropriate, display an error message and roll everything back. I covered an example of this kind of process in a recent article, Conditional Field Requirements with Business Rules and Real-Time Workflows.
Next – and on to the topic of this article – there's a certain type of business logic that depends upon each instance in a series of consecutive processes being fully completed before the next instance is started. In Dynamics CRM, a common occurrence of this is where one instance of a process updates a piece of data that is required by the next instance of the process. Two examples include auto-numbering workflows, and workflows to perform round-robin record assignment.
Jukka Niiranen wrote an excellent article recently on the first of these, Auto-Numbering with CRM Workflows: Real-Time vs. Asynchronous.
In this article I’ll apply a similar treatment to round-robin record assignment.
Round-Robin Record Assignment
Round-robin record assignment is a common business requirement: as records are created, they are assigned to users in sequence. Think of an ordered list of eligible users, assignments going from top to bottom; when the bottom of the list is reached start back at the top.
To accomplish this with a Dynamics CRM workflow, the general idea is to attach every record that needs assignment, let's say a case, to a single parent record (on a custom entity) that contains a numeric counter field. Each workflow instance uses the counter to determine who is next in line for assignment, and then increments the counter to get things set up for the next person in line.
If you have ever tried to implement a process like this in Dynamics CRM 2011 your testing may have revealed that it works sometimes…but not all the time. The asynchronous processes we had in that version (referred to as background processes in CRM 2013) are almost but not quite the right tool for the job, because you cannot be certain that updates performed by one process are completed before the next process starts. But with real-time processes, every action performed by an instance of a workflow is completed before moving on to the next one. So in a round-robin assignment process, you know for sure that the counter has been incremented by one process before the next one starts.
To understand why real-time workflows are the right tool for this job, let’s build a simple workflow process that assigns cases to a fixed group of five users on a round-robin basis. If you want to follow along, start by creating a custom entity – I call mine Process Settings – with the minimum requirements summarized as follows:
|
Entity Name:
|
Process Settings |
|
Custom Field: |
Current Participant, Type: Whole Number
|
|
Custom Relationship: |
1:N relationship to Case:
|
|
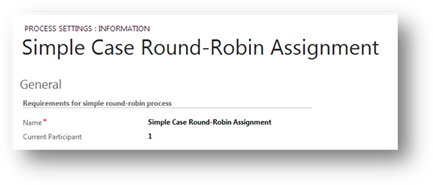
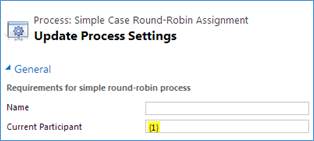
After creating and publishing the Process Settings entity, add a single record, and if necessary add the Current Participant field to the form, so it looks something like this:
|
|
The components of the workflow – the properties and the process steps – are illustrated in the following table along with brief explanations of each:
|
Workflow Component |
Illustration, Description |
|
Properties, Steps Overview |
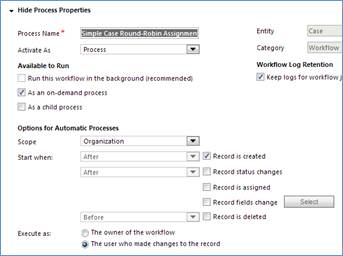
As far as the properties go the most important thing of course is whether it’s a real-time or a background workflow. The trigger in this example is Record is created, but notice this workflow can also be run on demand, which can be useful for testing. The properties are shown in the following figure:
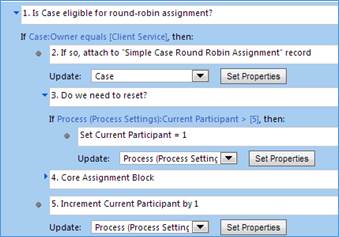
The process steps are illustrated in the figure below. It’s intended to convey the overall structure of the process, so I collapsed step 4 to fit everything into one screenshot.
Detailed explanations of the steps are provided next.
|
|
Steps 1 and 2: Attach case to Process Settings record |
Most organizations I’ve implemented round-robin processes for don’t necessarily want every record assigned in this way. In this example, we start by checking if the new case is assigned to the Client Service team. This is a flag that indicates the process should be applied to the record; on the sales side you might have an “Unassigned Leads” team that plays a similar role for round-robin lead assignment.
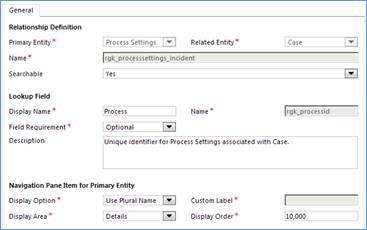
Once we determine that the process should be applied, the case needs to be attached to the specific record on the Process Settings entity. That’s done in the Update step. Remember: we created a 1:N from Process Settings to Case, which is expressed on the case as a lookup to Process Settings. Assuming you do not place the lookup on the case form, navigate to the Additional Fields section and fill the lookup field:
|
|
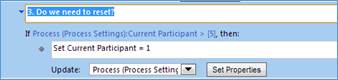
Step 3: Check counter, reset if necessary |
Now that the case is attached to the process settings record, you can check the Current Participant field value. If it exceeds the number of eligible users (5, in this example), reset it by updating the process settings record, resetting its value to 1.
|
|
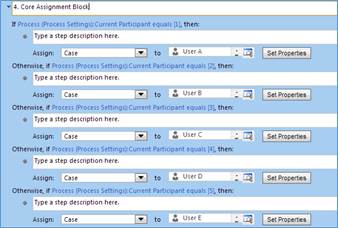
Step 4: Core Assignment Block |
The record assignment is done with a big, somewhat tedious block of If and Otherwise, if steps:
|
|
Step 5: Increment counter |
Once the assignment is done, increment the counter (remember: the Current Participant field) by 1 so it’s pointing to the next user in line:
|

Real-Time v. Background Implementation
With the round-robin process in place there are several ways to test it, and specifically to illustrate that the real-time version works all the time while the background version works…some or most of the time. The approach Jukka used in his article was to bulk import account records: his auto-numbering workflow fired on the create trigger, so as long as it’s activated when you import, every account record created will have the process applied to it.
|
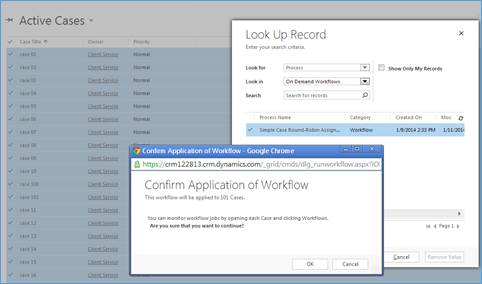
For the sake of variety, let’s use a different approach here. Remember that the workflow process we just covered is available as an on demand process. If I have 100 or so cases, all eligible for round-robin assignment, I can just select them all and apply the Simple Case Round-Robin Assignment process to all of them at the same time…or at least as close to “all at the same time” as we can get:
|
|
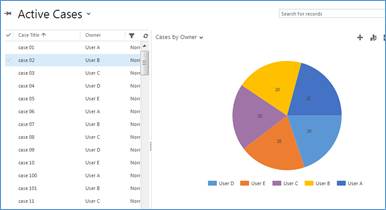
The way this process is written, you would expect an uninteresting distribution of cases across owners after applying it to those records, and sure enough, the custom Cases by Owner chart illustrated in the following figure confirms it:
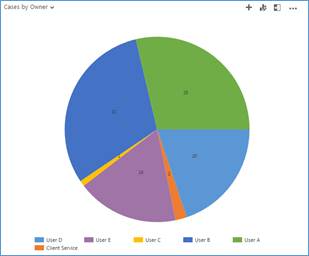
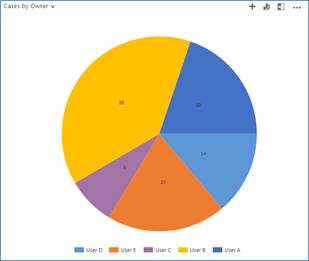
Now let’s see what happens if the process is not real-time:
- Open the process in the process designer.
- Deactivate it.
- Click the
 button on the ribbon.
 - Activate it.
- Reassign all the case records to Client Service.
- Select all the records and run the workflow on demand.
Instead of the hoped-for boring results we saw just above, you don’t really know what you’ll get, and if you have the patience, you can verify that you’ll get different results each time you test. For example, on two successive runs I got the following results:
|
|
|
The problem isn’t with the way the workflow’s written, and for some use-cases, a round-robin record assignment process like this one works fine. For example, if you manually create case records, and leave a decent interval – say, 30+ seconds – between record creation, you will get the expected even distribution of owners across records. Again, the problem is that with a background/asynchronous process you can’t be sure one process is done before the next one starts. So if you ever wondered why those time-dependent processes you wrote in CRM 2011 seemed to work…most of the time…but kind of…didn’t always work, especially if records were created in rapid succession, now you know why.